Difference between revisions of "Cash Management Manual"
en>User m (1 revision imported) |
m (1 revision imported) |
(No difference)
| |
Latest revision as of 12:59, 8 January 2020
Keystone Cash Management System User Manual and Reference
Version 1.1.6 10/14/2004
Version 2.9.9 03/08/2016
Windows is a registered trademark of Microsoft Corp. Interbase is a registered trademark of Embarcadero Corp. All software, the Keystone name and related documents are the proprietary trade secrets and property of GivenHansco Inc., Columbus, Ohio, USA. All rights reserved. GivenHansco is not responsible for misprints in this document. No Warranty is implied in the use of the software. Keystone is a registered trademark of GivenHansco, Inc.
Copyright 2002-2016
Contents
Keystone Accounting Cash Management System User Manual and Reference
SYSTEM OVERVIEW
Introduction
The Keystone Accounting Cash Management System is a financial application in the Keystone software suite. It provides the functions of managing and reconciling multiple bank accounts, and is fully integrated with Keystone Accounting Accounts Receivable, Accounts Payable, Payroll and General Ledger systems.
Cash Management may be run in a multi-user environment, but only one user at a time may actively enter transactions and reconcile accounts.
Data Flow
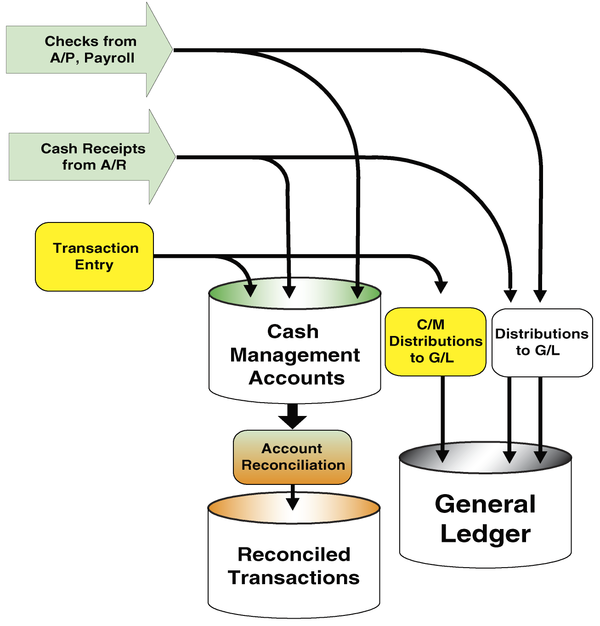
Data Flow through Cash Management System

Transactions
Cash Management transactions or items are checks, deposits, interest payments, bank service charges (fees), transfers, dividends and miscellaneous. These items may enter the system either by manual entry (Transaction Entry), or may flow from other Keystone Accounting applications—Keystone Accounting Accounts Receivable, Accounts Payable and Payroll. If you choose to set up your Cash Management system with full interface to these applications, Accounts Receivable will generate deposit items, and Accounts Payable and Payroll will send check items.
Integration with General Ledger
The diagram below summarizes data flow between Cash Management and other Keystone Accounting applications; Cash Management functions are shown in blue.
- Transactions from other applications
Every transaction in the Cash Management system is tied to General Ledger entries. It is important to keep clear that Cash Management items are not General Ledger entries, although they are in strict correspondence with GL entries. Transactions from other applications enter the Cash Management system at the same moment as they flow into the General Ledger Distributions. If G/L Distributions are not run until the end of the month, you can have transactions in Cash Management whose activity is not yet reflected in the live General Ledger. Checks and deposits generated by A/R, A/P and Payroll are tagged with the transaction number under which the generating application posted them to the General Ledger.
- Transactions entered in Cash Management
When a batch of Cash Management items is posted in Transaction Entry, General Ledger distributions are generated. Run the C/M Distributions to G/L to post the distributions to the live General Ledger.
Clearing transactions
Cash Management transactions may be either open or cleared. They are initially open, and are cleared selectively in the process of Statement Reconciliation. The choice to clear an item means that to the best of your knowledge it has been successfully processed by the bank. Usually it means that it is shown on a current bank statement.
Reconciling Transactions
Transactions leave the system by being reconciled and (eventually) purged. Every time you reconcile your bank statement to your Cash Management records, the cleared items are marked Reconciled, and become account history (you can still view them but can\’t change them).
System Startup
In order to get your Cash Management system started in correct alignment with your other applications, there are some special steps to take when you first get your system up and running.
- Set up your bank accounts. All cash accounts referenced by Accounts Receivable for deposits, or by Accounts Payable and Payroll for check printing, must be set up under the correct General Ledger account number. These must be balance sheet debit accounts, with Account Class "BA" for Bank Account. After setting up the G/L Accounts, go to Bank Account Maintenance to enter bank account information.
- Go through the following steps for each bank account:
- Reconcile your most recent bank statement by hand (or whatever method you have been using). It is vital that you also have a complete ledger of any outstanding transactions that are not shown on the bank statement.
- Go to Transaction Entry and pull up the account. The system will show a Balance Forward transaction in the amount 0.00. Edit that amount: enter the account balance from your reconciled statement. (You may also want to change the Description of the Balance Forward transaction to "INITIAL BALANCE".) Now enter each outstanding transaction in the account. When you are finished, post the batch.
- Repeat steps 3 and 4 for each account.
- Now print a Cash Transaction Ledger for all your accounts, and verify that the transactions you have entered into Cash Management agree with your external records. This means, for each account:
   a. The most recently reconciled bank statement matches the statement balance     	on the Cash Transaction Ledger;
   b. Outstanding transactions match up one for one.
- Contact your GivenHansco representative and ask them to activate your Cash Management interface. From this point on all checks and deposits entered through A/R, A/P and Payroll will automatically flow into your Cash Management ledgers.
MENU OPTIONS
Transaction Entry
Use this option to enter new transactions. Normally most checks and deposits flow directly (and automatically) from Accounts Payable, Payroll and Accounts Receivable, so the usual function of Transaction Entry is to enter bank charges and interest payments prior to reconciling a statement. The items you see and edit on the Transaction Entry screen belong to the current entry batch. They are not added to the ledger for reconciling until you Post the batch. Select a bank account on the Transaction Entry screen.
Transaction Entry screen:
At the top of the screen, 3 counts and running totals are shown:
- Debits|total of debit items in current batch (Checks, Transfers and Service Charges)
- Credits|total of credit items in current batch (Deposits, Miscellaneous, Interest and Dividends)
- Total|grand total of all items in current batch
Display Options:
Drop down the Options menu to change the order in which the screen displays transactions. Newly-entered transactions will always stay at the bottom until the batch is saved or the sort order is changed.
Transaction Entry Process:
Add items by going to the end of the batch and pressing TAB or down-arrow. You may use arrow keys, tab, shift-tab, up, down, left, right arrows, pg-up, pg-down, home and end keys to move between transactions and data fields. When you reach the bottom of the screen it will scroll automatically.
Each item has the following data fields that you may enter and edit.
- Type You may enter 7 types of transactions: Checks, Deposits, Interest, Service Charges, Transfers, Dividends and Miscellaneous. Once you choose the type of transaction on a given line, you can\’t change it. If it is the wrong type you must delete the item and re-enter it.
- Date Posting date of the transaction.
- Check No. For items other than checks, you may use this field for any other information you wish.
- Payee/ Description For checks enter the payee name; for other transactions enter the description. For transfers, you may not edit the description; the system automatically uses the account number of the target account.
- Amount Amount of transaction. For credit transactions (Deposits, Miscellaneous, Interest and Dividends) the amount is added to the balance of the account; for debit transactions (Checks, Transfers and Service Charges) it is subtracted.
- Check Memo For checks, information that may be on the memo line. For other transactions, use for any additional information.
- Target GL For any type of transaction except a Balance Forward, the screen will force you to enter a General Ledger account number to post the transaction against.
- Transfers will only accept a GL number that is set up as another Cash Management account.
- Checks may use any GL number.
- Press F9 or double-click the transaction to enter multiple distributions
The following actions are available through F-keys and/or buttons:
When you are finished entering items, you may either press F2 to save the batch without posting it (leaving it open for further entry and editing later) or press F8 to post the batch so that the account can be reconciled.
Recurring Transactions
Save changes checkbox
Date change option||Use this option to enter, edit and/or post repeatable batches of transactions. You enter transactions in the same way as transaction entry Transaction Entry (see above), but when you post the batch it remains on file as a batch that can be edited and posted again later. Use a recurring batch for a group of transactions that you need to enter on a regular (weekly, biweekly or monthly) basis, with few if any changes from week to week. A common example is for payroll checks generated by an outside payroll service. There are three major steps in using recurring transactions:
- (Once only) Create a new batch: proceed exactly as in normal Transaction Entry, entering transactions and their appropriate GL distributions. When finished, save the batch.
- (Once per period) Make any necessary changes to the saved batch: bring up the batch and again proceed as in Transaction Entry, except with the two additional options described below—save changes when posting, changing posting date. When finished, save the batch only if the changes made should carry forward to the next period.
- (Once per period) Post the batch.
Option to save changes when posting
The Recurring Transactions screen has a checkbox to indicate whether changes made to a saved batch will be saved when you post the batch. If you uncheck the box, changes made to the batch will be discarded after you post the batch. This is helpful in a case such as the outside payroll example: each employee has a standard pay amount which you would override when necessary, but the batch would revert to the standard amounts for the next pay period. You can still make permanent changes to the batch (as for example when an employee\’s standard pay changes) by using F2-Save. If you leave the box checked, any edits made to the batch will be saved with it when you post it.
Changing Posting Date
When you change the posting date of the batch (the Posting Date field in the top part of the screen), you have the option of setting all the individual transaction dates to that date. If all or most of the transactions can be posted with the same transaction date, this saves you going through the transactions to give them all appropriate dates for the current period.
Statement Reconciliation
Use this option to reconcile your accounts. The items you see on the Statement Reconciliation screen represent the total activity of the account. They may come from Accounts Recceivable, Accounts Payable or Payroll activity, or they may have been entered through Transaction Entry (see above).
Before going to Statement Reconciliation, use Transaction Entry to enter any interest payments and service charges (bank fees) showing on your bank statement. Any other activity exclusive of Accounts Receivable deposits, Accounts Payable checks and Payroll checks must also be entered.
Statement Reconciliation process
To reconcile a bank statement:
- Select a bank account to reconcile.
- Enter the ending balance from your bank statement in the Statement Balance box at the upper right.
- Make the Deposit transactions match the bank statement by combining them as necessary.
- Reconcile to the ending balance by clearing open items.
- When the Discrepancy is reduced to zero, reconcile the account.
Cleared items show a " " to their left. Clear transactions by clicking in the check box at the left, double-clicking anywhere on the transaction, or pressing the spacebar. Using the space bar will clear the transaction which is currently selected and also move the focus to the next transaction. You may use the mouse, or up and down arrows, pg-up, pg-down, ctrl-home and ctrl-end keys to move between transactions. When you reach the bottom of the screen it will scroll automatically.
Running Totals and Balances
At the top of the screen, running totals are shown for currently cleared items. Beginning and current balances are shown, and the cleared balance, cleared total and outstanding total are updated continuously as you work. The difference between the Statement balance and your Cleared balance is called the Discrepancy. It must be reduced to zero before you can reconcile the account.
Running Totals and Balances
Balances
- Beginning|Total of all reconciled transactions in the account. Should match the balance from the previous bank statement and the beginning balance on the current bank statement.
- Cleared|Beginning balance plus cleared items; must equal Statement balance to reconcile the account.
- Current|Total of all transactions in the account. Also known as final or actual balance.
- Statement|Ending balance on current statement. (Enter from your printed bank statement.)
Combining Deposits
You may have multiple transactions showing in your account that actually belong to a single deposit. For example you may have posted cash receipts in Accounts Receivable, transferred funds from a holding account, and/or entered other Miscellaneous transactions, which were all taken to the bank and deposited on the same deposit slip. To combine the transactions into a single deposit, select them by clicking on them; they will show highlighted in blue. (Click again to un-select.) Notice that only Deposits, Miscellaneous, and Transfers into the account can be selected. The Selected Deposits box in the bottom left corner shows the total amount selected (as shown at left). Press F7 or click on COMBINE to merge them all into a single deposit transaction.
Reconciling
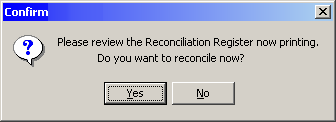
At any time you can save your work for later without reconciling by pressing F2. Notice that the Cleared balance at the top of the screen changes automatically as you enter clearances. If you need to add transactions (such as interest, fees, or other adjustments), save your clearances by pressing F2, and go Transaction Entry to enter your transactions. Finally, when you have entered all clearances, the Cleared balance should equal the Statement balance, and you can press F8 to reconcile. The screen will not let you reconcile unless these amounts are equal to the penny. Before the transactions are finally reconciled, a Statement Reconciliation Register will print. Review it carefully before proceeding to reconcile; once a statement is reconciled it cannot be "un-reconciled". If the reconciliation register matches the bank statement, click Yes on the confirmation box as shown at left.
Reconciliation Register confirmation

Selected Deposits box
Sort and Show Reconciled Options

Display Options
Drop down the Options menu to change the order in which the screen displays transactions, or to change whether previously-reconciled transactions ("history") are shown in grey. These items cannot be uncleared or changed in any way.
F-Keys and Buttons
The following actions are available through F-keys and/or buttons:
Bank Account Maintenance
Use Bank Account Maintenance to set up the bank accounts you will be using in the Cash Management System. Each bank account must have a General Ledger cash account number in your Keystone Accounting GL System; the General Ledger account must be a debit account on the balance sheet and must have account class \’BA\’.
Use the Enter, Tab, up and down arrow keys to move between fields. Data fields in each bank account record:
- GL Account|This is the cash account in your General Ledger to which this bank account is attached. You can\’t change it on this screen, because both Cash Management and General Ledger records may refer to it.
- Description|Nature/purpose of account.
- Acct \#|Account number assigned by the bank.
- Name|The bank name.
- Address, City, State, Zip, Phone, Fax |Mailing address, etc.
- Contact|Primary contact person at the bank.
- Last Statement Reconciled|Informational field—you can\’t change it here. This is the last reconciled balance.
- Current Balance|Informational field—you can\’t change it here. This is the total of all transactions in the account.
- Interest GL|When you enter an interest item in this bank account, this GL account will come up as the default.
- Svc Chg GL|When you enter a service charge item in this bank account, this GL account will come up as the default.
Cash Transaction Ledger
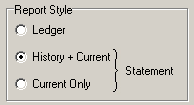
For each bank account, the Cash Transaction Ledger prints a listing and total of posted transactions. Two basic report styles are available:
- Statement—transactions are listed as on a bank statement, with separate sections for current activity and reconciled history. You may choose to show the detailed history, or just a balance forward.
- Ledger—transactions are listed in the sequence chosen, with reconciled and current activity intermingled.
If needed you can select a range of posting dates or cleared dates, and choose the order in which items are listed. The first column of each item prints a flag indicating the status of the item: blank for open, "CLR" for cleared (but still open), "REC" for reconciled.
Bank Account List
The Bank Account List simply prints out the full account information for each bank account in the system. This is the information you enter in Bank Account Maintenance (above).


