Setup Periods
Contents
Overview
Keystone posting and reporting is transaction date based. Transactions are posted and retrieved by Date rather than a defined accounting period. This has many advantages including the ability to run any report for any prior period and to handle calendar and fiscal years without the need for rigidly defined accounting periods.
The Setup Periods feature controls posting in all Keystone accounting modules (AR, AP, GL, Payroll, and Cash Management). There is a Setup Periods menu item for each module allowing for separate control over posting in each module.
It is Setup Periods that ultimately determines if an accounting period is “open” or “closed” (i.e. posting in the period allowed or disallowed)
Best Practice
It is recommended practice to close accounting periods both before and after the periods you are currently working in. Only one period should be marked ‘O’ (open for posting). Periods can be Opened and Closed as needed to permit posting (i.e. to post into a previously closed period).
Because Keystone is based on dates rather than defined accounting periods, it is important to prevent posting to periods that are not actively in use to eliminate the potential of post transactions to an incorrect date. With systems based on defined accounting periods, preventing posting to an incorrect period is accomplished by having only 1 period open or active at a time (i.e. it is only possible to post into the open or active period). The same result is achieved in Keystone though the strategic use of Setup Periods.
Closing periods that are not in accounting periods that you are not actively using eliminates the possibility of posting to an incorrect date in a closed period.
Working with Set up Periods
Note: Periods are “Open” by default. In order to have only on period open at a time, you must close periods after creating them.
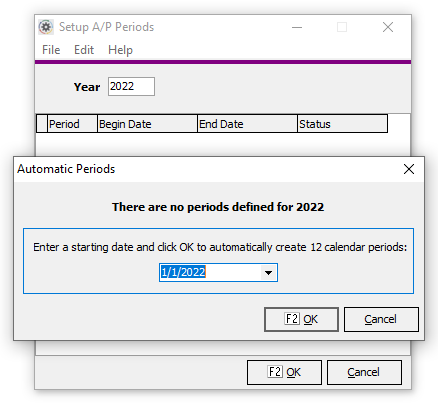
Create Periods for a New Year
- Select “Setup Periods” from the Accounts Payable Month End menu.
- Enter the year to be setup (e.g. “2008”) in the Year box and hit “tab”
- Follow the prompts to fill in the 12 calendar months automatically.
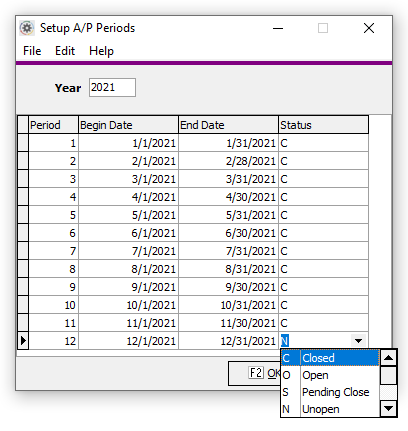
- Close periods not immediately needed for posting (e.g. Feb-Dec)
- Click OK or press F2 when done.
Close Periods for Ending Year
- Enter Ending Year (e.g. “2021”) in the Year box and hit “tab”
- Mark the Status “C” for Closed.

