AP: Year End
2024 Year End
UPDATED 12/5/2024
Keystone 4.7.6 and higher provides the ability to print 1099-DIV, 1099-INT, 1099-MISC and 1099-NEC forms using the Web Services Process.
This process is performed via our 3rd party partner Nelco. See: Web Services Pricing Information
Year end processing
Setup Periods for the new year

- Select “Setup Periods” from the Accounts Payable Month End menu.
- Enter “2025” in the Year box and hit “tab”
- Follow the prompts to fill in the 12 calendar months automatically.
- Click OK or press F2 when done.
Close Old Year (also see Setup Periods)

- Select “Setup Periods” from the Accounts Payable Month End menu.
- Enter “2024” in the Year box and hit “tab”
- Mark the Status “C” for Closed
Run Year End Processing

- Open Month/Year End Processing from the Month/Year End menu of Accounts Payable
- Enter Month and Year
- Click OK
- When prompted to backup optionally Click YES to proceed.
Note: Running Year End Processing recalculates Year to Date Purchases and Payments for the new and prior year. If you make transactions into AP after running Year End Processing, run the process again.
Processing 1099s
Preparation
Set up 1099 States
1099 State Code Maintenance is used when...
- State 1099s are required
- Federal 1099s with multiple boxes are used. (NOTE: This code is automatically created by Keystone)
For each state enter...
- Description
- State ID No.
- Sequence - Your home state typically comes first.
Set Tax Information for Vendors
Review vendors using AP Vendor Maintenance.
- Verify the Name. Set 1099 Name to the official name for tax reporting to handle dba vendors - Only if needed.
- On the new Taxes Tab...
- Verify 1099 Classes are setup properly. If necessary setup new 1099 classes in 1099 Class Maintenance
- Verify Tax ID No.
- Set the Type of TIN Required if you are using Web Services.
- Set the Tax ID Type. This is used for W9 and not for 1099s.
- Set Account No.
- Use AP Vendor Maintenance to setup the 1099 address where needed. (Only use this when the 1099 address is different than the standard address. These fields hold larger values than the standard address.)
Adjust 1099 Amounts for Vendors
Both state and multi-box federal amounts are configured on the new "1099 Amounts" tab in AP Vendor Maintenance. Skip this section if you want to rely on traditional 1099 method of reporting the Previous Year, Current Year or Transaction Amounts from the main Vendor record.
State Amounts
Make sure 1099 States are configured (from A/P File Maintenance menu).
On the 1099 Amounts tab, for each state and 1099 Class that apply to the vendor enter the:
- Tax Year
- 1099 Class (e.g. 1099-INT)
- State
- State Income
- State Tax (where applicable)
Federal 1099 Amounts
This is typically used for Federal 1099s with values in multiple boxes. Do not set this up if you want to rely on Previous Year or Current Year balance for the Vendor.
In this case, separate 1099 classes should be already configured to represent each box that could print on a 1099 form.
When entering amounts on the tab for Federal use "00" as the State ID. Add one line for each box with the appropriate 1099 class and amounts.

NOTES:
- Any Federal Amount entered will trigger a 1099 to print even if it's less than the "Minimum Amount for Federal 1099"
- When Federal Amount is entered for a 1099 class, it will override the "traditional" value for that class (e.g. "Prior Year Summary").
- Entering 0 for Federal Amount for a 1099 class will cause that class to be skipped, even if a value exist based on the "traditional" value.
Processing Web Services 1099s
Use Web Services option for E-Filing, State and Multiple boxes on single 1099 form. Instructions are developing. If you plan to process 1099s with Web Services before all instructions are complete, please contact GivenHansco support.
Use must this option if...
- Processing State 1099s
- E-Filing Federal 1099s
- Processing Federal 1099s with multiple boxes on a single form.

- Select Federal & State 1099 Export from the Web Portal Export/Filing menu
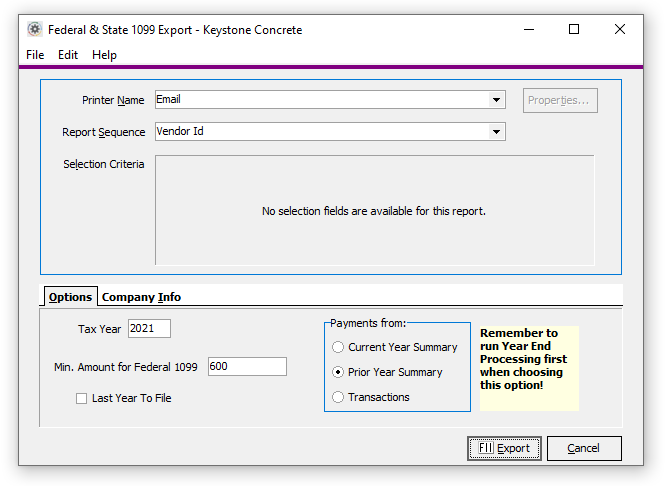
- Verify Year is 2024
- Set Min. Amount for Federal 1099
- Select Payments From option
- Setup information on Company Info Tab
- Name/Address City/State/Zip
- Federl ID Number
- Iowa E-File Number
- Payer RTN
- Select Export
- Review report for accuracy
- Continue to Export. NOTE: Select a file location that will be easy to find for the Web Portal Upload.
- Upload To Web Portal
- Web Portal Dashboard

Preparing for 2025
- Use AP Vendor Maintenance to:
- verify W-9 Tax Types
- verify TIN types.
- Set Default 1099 State Code - This will be the default used for 1099 vouchering detail for 2025.
- When using Invoice Vouchering - you may choose to enter the appropriate 1099 Type along with the 1099 state. This will provide data you can use for next year's 1099s.
- Keep up to date on new rules. Prepare for 1099s going to all corporations.